Well, it took a few days to get my oomph back after Convergence. Spent a few evenings studying books on machine knitting and put my new machine together. It's a basic, entry-level knitter and I'm looking foward to making lots of projects on it -- especially blanks for space-dyeing yarns.
I quickly realized that I would need to do something about a table before I could use the machine. It has to be bolted on to a table. Turns out I don't have a table sturdy enough for a knitting machine that can accommodate the clamps. I don't have room for another piece of furniture in my house, so I did some research on knitting machine stands and my friend Holly and I made a trip to Newton's Yarn Country on Saturday.
They were having one of their parking lot sales (yee-haw!) and as usual they were very busy. But that didn't stop "Mrs. Newton's" from taking a few minutes to talk with me about tables and accessories. And "Mr. Newton's" stopped pulling yarn out of the warehouse to look for a stand for me. How pathetic is it that as many times as I've been to their store, I haven't learned their names?
Anyway, I was quite impressed that they had two choices of stands in stock, and that they didn't try to sell me the more expensive one. We talked for a few minutes about my machine and plans for using it, and they suggested that the costlier one would be overkill, and I think they were right. Having done my homework, I knew the lowest price I would pay if I bought online, and I actually spent about $30 less, even adding in the tax.
As I was looking around the shop, I noticed a couple of cases near the knitting machines. Turned out they use rifle cases, same as Nancy Roberts recommended. They sell them at their cost (less than I would have paid buying it direct) so I got a very fair price on a case.
Of course, I couldn't visit Newton's on a sale day and not check out the yarns. So we bundled the new stand, rifle case, and a couple of garbage bags of yarn suitable for machine knitting into the car. And I think I may have Holly hooked on fiber arts because she came home with a few cones of yarn, too!
Soon as I got home I had to check out the case. Everything fits just right and the foam in the case even keeps all the small stuff from moving around. Now I need to figure out how to embellish it so it's clear that it does
not contain firearms. As much as I'm in favor of keeping my
constitutional rights, I don't need anybody thinking I'm carrying.
Then I put together the stand (instructions were excellent and easy to follow) and got the machine clamped on. Funny that there was no indication of how the machine should be oriented on the stand. I looked all over the internet and found zip. Guess you're just supposed to know what the purpose of the arm thingies is. (Turns out they're for other machines that have different case configurations. All I needed was a simple solid surface to clamp to. I was surprised at how sturdy the stand turned out to be -- It doesn't wobble a bit. And it will be so easy to transport it to classes, etc.
I was about to spend a few hours over the weekend getting better
acquainted with the machine. So far it's been quite easy to follow the
instructions in the basic guide to the machine. Learned a little about
using the transfer and tappet tools, and made a small pile of samples
using different techniques. Here goes (photos show front of fabric on
left, back on right):
Pile of Samples
Color Changes
Tuck Stitch
More Tuck Stitch with Loose Gauge
Tuck Stitch in Colors
Tuck Stitch in Colors, Changing Yarn in Different Rows
Slip Stitch - Hard to See Diagonal Effect
I Think This Was the Start of Lace Stitch
Plating, Using Every Other Needle, Variations in Gauge
Plating, Using Every Needle
I had a ball learning about these techniques. It's a bit like driving a car, where you have to keep track of several things going on at once. Make sure your inactive yarns are out of the way, check your active yarn tension, be sure the carriage goes past all the live needles on each pass, on and on. Just when you're confident that you've got a handle on it, you make a pass and knit your work right off the machine. But that's why we have classes and books to help us learn, right?
Speaking of books, here are the ones I'm currently reading. Bought the first two. Borrowed the third but I'm going to buy it one of these days.
Mid-Gauge Basics + Much More.
This is the first book I bought and it expands on the techniques in the LK 150 manual. Offers several simple but attractive projects for learning the ropes. Can't wait to make the baby cardigan for my new great-niece!
The Uncomplicated Knitting Machine.
This is a common-sense guide to
machine knitting that takes the fear out of approaching a project.
Takes you through the phases of knitting different styles of sweaters
from planning to execution to finishing. Maybe the family will be
getting sweaters this Christmas.
Hand Manipulated Stitches for Machine Knitters.
This book has a really clear explanation about how knitting machines work, various tools you might need, and the basics of casting on and binding off before it gets into the more exotic and decorative stitches. It may be a while before I'm ready for more than just the basics, but the directions in this book are so clear and well illustrated that it's going to be a pleasure to use it.
Returned home from Convergence on Saturday afternoon and my brain is just now beginning to function again. This is a conference of fiber artists sponsored by the Handweavers Guild of America every two years. In addition to a fashion show, tours, speakers, and exhibits, the main attraction for me is a variety of classes on all kinds of topics.
First I have to say a few words about the conference in general. I have to acknowledge that it is hard work to organize a conference. Been there, done that. And it's expensive to rent space, buy supplies, pay staff, etc. But this year it seemed a bit pricey and disjointed.
Classes were held in three different locations. Not a good start. Instead of one large location where people gathered between events, we were spread all over. The food services in the conference center were ridiculous. $4 for a bottle of soda? Seriously? Not the HGA's fault, but this type of thing should be considered when choosing a location.
The vendor hall was a slight disappointment. Not the vendors' fault. But times are changing and since it's so easy to purchase anything you need over the internet, anything you buy at a conference has to be rare enough or enough of a bargain that you're willing to cart it home. I think with so many people having to tighten their belts, there were fewer shoppers than could support such a large marketplace. I would hate to see the vendor hall end, but it does need to evolve. Since I was driving and getting purchases home wasn't a big issue, I did buy a couple of pounds of reasonably priced roving and some Firestar to use for blended batts. And some socks with sheep. Every weaver and spinner should have socks with sheep, right?
Final gripe before I get down off my soapbox: the fashion show. After the Albuquerque show two years ago, I had really high expectations for this year's show. What a disappointment. The lighting was bad, the slides crediting the artists were out of synch, and the staging... Oh, my. I applaud the organizers for using models of all shapes and sizes. It's refreshing to see real clothing on real women. But there is simply no place in a fashion show for visible panty lines. Most of the models were in black leggings that were far too small (plus one memorable spandex or perhaps wetsuit fabric garment). Would it have been that hard to provide the models with slacks and tanks that fit well? I know there is a trend toward tight clothing, but please, let's showcase the artists' garments - not the hindquarters of the models. I have to say that if my weaving was of a caliber to be featured in a show, I would think twice before trusting the Convergence people to stage my work.
Down off soapbox. Nonetheless, I had a wonderful time at Convergence. Met a lot of new people and had a chance to spend time with friends. And two of three classes were fabulous.
I took a two-day workshop called Machine Knitting to Dye For, taught by Nancy Roberts. There were only five students in the class, so we got a lot of individual instruction and whenever someone had a potential disaster (which happens a lot with beginning machine knitters), Nancy was right there to rescue us. The basic concept is that you use a knitting machine to make blanks in the basic shape and size of the finished garment you want to make. Then you dye the fabric, unravel it, and knit it by hand or machine into your final garment. Theoretically, you get more control over the placement of color. And you can get longer repeats of color than you would when space-dyeing yarn.
Nancy brought a lot of sample of her work.
Then we got down to work with the machines. After just a few minutes of instruction we were making blanks for sampling. Even with blunders, it was so much fun and so fast knitting with the machine that I had made up my mind before we broke for lunch to buy the machine I was working on. This is a Silver Reed LK150, an entry-level machine that does basic stockinette knitting. It also has optional carriages for Fair Isle and Intarsia knitting, which, of course, came home with me. Like I need any more hobbies. But I have wanted to use a knitting machine ever since Mom had one in the sixties (which, incidentally, never worked), This will give me a chance to use up some of the yarn in my stash that I would never weave with. Give me a few more minutes and I will come up with yet more rationalizations for having bought another gadget.
By the end of the day, we had each made three "sampler" blanks, plus blanks for the project of our choice. I decided to try the project shown on the magazine cover in the topmost photo of Nancy's samples. I even had time to knit three more large blanks just for playing with different color combinations. The blue yarn in these blanks is "waste" yarn for starting and ending the blanks (and sometimes dividing sections). It won't end up in the finished product.
On day two of class, we started working with dyes. Nancy presented a simple method of calculating the amount of liquid and proportion of different dye colors for a given piece of fabric by weight, and we made these samples. The blue on the right here was supposed to be a lesson in controlling the intensity of a single color. I had a little issue actually getting the whole stripe colored, but lesson learned. The others were methods of transitioning between two separate colors (browns on the left) and three separate colors (reds and purples on the right). By the time we got to the three color sample I was getting a handle on painting the stripes.
Finally, we had to choose our own color combinations and paint our blanks. I started with the blue and green piece on the left below. Was supposed to be purple transitioning to teal but I didn't like the first set of colors I made and by the time I finished fiddling with them, there was not so much purple. I took a lot of time painting the stripes. Even though the colors naturally bleed from one section to another, for some reason they don't like to seep into the dividing rows, which are simply knit with a looser tension. So there is quite a bit of undyed or very lightly dyed yarn in my fabric, which I actually like. By the time I got to the second blank, we were running out of time, so I very quickly made up four colors by blending different proportions of red with yellow and slopped the dye on my blank. And I loved the result. Next step will be to unravel the blanks and then knit them into the bag. That's going to be a while.
Mid-conference I had to move to a different hotel. That was fun. Had to move out of the Travelodge in the morning and couldn't check in at the Marriott until late that afternoon. Thanks to Gail and Kathleen for sheltering Big Tom in their room so I didn't have to leave him unattended in my car all day. (For those who don't already know about Tom, he's my drum carder.)
My second class was in adding electric components to "wearable" art. Basically, we stitched circuits between a battery holder and some LED lights using silver-coated thread. When the battery is inserted into the holder, the LEDs light up. I tried to use a resistor and a light sensor in my project, but they did not allow enough current through to light all three LCDs so I settled for an always-on design where you have to remove the battery to turn off the circuit. The idea has potential but I wish we had learned more about the different components and basic formulas for figuring out how much load to put on a battery and using resistors properly.
The Clutch Without Battery
Battery Inserted
My last class was Weaving on a Bow Loom, taught by Marilyn Romatka . This technique is featured in her book, Creative Crafts of the World. This is done in Thailand but has been found in earlier aboriginal cultures as well. Marilyn was an entertaining and engaging teacher, and I would take another class from her in a heartbeat. This is a very simple technique that could be taught to children, and the equipment and supplies can be extremely reasonable. For the loom, a dowel, two paper clips, a piece of fairly sturdy foam, and some electrical tape are all that's required. For the warp - whatever string or thread you choose, beads if desired, and two more paper clips to hook it to the bow. And for the weft, again, whatever string or thread. You are limited to a fairly narrow band of fabric, but the sky's the limit when it comes to colors and bead placement. The bottom photo here shows of the "bridge" made of foam, that holds the unused beads out of the way and keeps the warp threads in order.
After class, I made one final round of the vendor hall, visited with a couple of friends, and made my way home. Sat down in my chair with Tallulah and took a three-hour nap. Woke up long enough to take a shower and another nap till bedtime. Went to bed, slept till six, got up, and took another nap. All told, I think I pretty much slept for 24 hours and was still tired. Good thing I don't have this much fun all the time!
Added 3/5/13: I gave myself Marilyn's book for Christmas and have been thoroughly enjoying it. In addition to bow loom weaving, it includes quite a few other folk arts that can be enjoyed by children and adults alike. I've been using Marilyn's book as a guide to teaching the bow loom as an introduction to basic weaving concepts and it works! Other crafts include aboriginal dot painting, Viking knitting (aka wire weaving), Huichol beading, natural dyes, weaving on a simple home-made loom, baumschmuck, paper stars, block printing, Pysanky, dreamcatchers, wet felting, twining, Maasai beading, and dragon boats. I bought this book for my own enjoyment, but encourage anyone who wants to introduce crafts to their children (or grandchildren) to start here.
I met some superstars of the fiber arts world this week...
Last weekend, I took a couple of classes with Abby Franquemont, author of Respect the Spindle. Friday's class was on drum carded art batts. Incredible! I took my Big Tom drum carder and in the course of a few hours our relationship changed entirely. Abby enabled me to overcome Tom's attempts to intimidate me. As much of an equipment junkie as I am, it was exciting to be in a roomful of all different models of carders.
Just a Few of the Drum Carders at Class
We experimented with many different types of fibers. Using different breeds of wool as a base, we added silk, alpaca, rayon from bamboo, firestar, hemp, and even some camel down. It was pretty exciting to have these smooth and beautifully colored batts coming from Tom after just a couple of minor adjustments in speed and drum position. In the interest of time, we worked with pretty small amounts of fiber, so the batts turned out the size of rovings.
Tom's First Batt of the Day
Abby Calls This "Yarn Porn"
The class was so much fun and so inspiring, I packed Big Tom and brought him to Convergence with me this week. Tonight he has been busy carding alpaca -- after making the licker in go a little slower and the big drum go a little faster, I'm getting the batts I was hoping for. So far Tom and I have created six batts of approx. .6 ounces each.
But that's not the end of my Abby story. On Sunday morning, I took another of her classes on spindle spinning for beginners. I took it mainly out of curiosity, but she made me totally want to learn to use this tool effectively. First of all, if you have ever seen one of her youtube videos, or better yet, her DVD verson of Respect the Spindle, you know that she is an incredible spinner. I h.ave never seen anyone who can walk around and spin while talking the way she does.
In the beginner class, we obviously couldn't get that far, but we learned several basic spinning techniques -- enough that I can at least use a spindle now for sampling even if I don't yet have the skills to produce any significant amount of yarn.
Soapbox time: Sorry I sound like a broken record, but I have to say, if you EVER have a chance to take a class from Abby or any other well-known fiber artist, DO IT! I love it that spinning and weaving are still relatively niche arts, so our superstars are accessible. And so far everyone I've had the good fortune to study with has been incredibly down to earth. Abby is extremely articulate and funny. And has a wealth of stories to share.
Stepping down off soapbox now.
Spindle and Yarn from Sunday Workshop
So I came to Convergence with a car full of equipment: Big Tom, a huge bag of washed alpaca, some beast waste, old silk thread that I'm going to shred and add to some batts, Bunny Watson and her accessories, a box of beads, fishing line, glue, and assorted items. Oh, and a few articles of clothing. Begrudging the space they took in the car.
I had planned to come down Monday morning, but had to go in to work for a few hours first. While talking on the phone with a colleague, I pulled out my hotel reservation confirmation and realized that I had reserved Sunday-Friday instead of Monday-Saturday! Still trying to figure out how I managed that one. I hope I excused myself but I have a bad feeling that my adrenaline rush when I realized my mistake caused me to hang up abruptly.
Of course, my reservation had been canceled when I didn't show up. After I begged and groveled for a few minutes, the hotel clerk took pity and gave me a room for just Monday - Wednesday nights. Figuring I could commute from home the rest of the week if I really HAD to, I took it. It was only after I checked in and paid for all three nights (non-refundable) that I though to try priceline.com. For Thursday and Friday nights, I was able to get a room at a better hotel for just $10 more per night -- and less than the conference rate. Hunh? I'll have to move to a new hotel Thursday but it's better than having to commute. Next conference I go to, though, I'm going to stay in the hotel nearest the conference location and check priceline before taking the conference rate!
I have a bad habit of misplacing my orifice threader, so I've been promising myself to make some and stash them wherever I usually spin. Since I had a few quiet hours yesterday afternoon, I got out the beads and made twenty of them! I used 50# test fishing line. Cut pieces 12 - 16 inches in length, folded them in half and pinched to put in a permanent bend, slid on 2-3 beads, put jewelry glue on the cut ends of the fishing line, then slid the beads down to the ends. They took only a few seconds to set up enough to stick without holding, and were completely dry overnight. No more paper-clip orifice hooks for me! Well, at least for the next week or two.
So today was my first day at Convergence! I had so much fun volunteering in the vendor hall at Albuquerque, I went down this morning and volunteered to help with setup. Spent a couple of hours helping vendors carry stuff from the loading dock to their booths, and got to talk with several superstar vendors. First, I met Henry Clemes and his son. My first hand carders way back in the eighties were from Clemes & Clemes. What a nice man, and so interesting. He's just come out with a blending board that I saw on Sunday and that looks pretty interesting. I'll have to stay away from his booth this week or my budget will be blown!
I also met Morgaine Wilder from Carolina Homespun. We had been unloading her truck (with all kinds of tempting fibers and equipment) for half an hour before we thought to introduce ourselves. She carries lots of fibers I haven't had a chance to try yet. Can't wait to visit her booth tomorrow!
Things got slow in the vendor hall, so I walked down to the Aquarium of the Pacific and wandered around for a couple of hours. Saw a 4-D cartoon starring an anthropomorphic and politically correct turtle. The fourth dimension turned out to be mostly fog and water sprayed from the ceiling at tactical moments. But pretty cute film, nonetheless.
I overcame my squeamishness enough to touch a jellyfish in one of the aquarium's "touching" exhibits. To tell the truth, I didn't feel anything but the moisture in the tank. I also got to pet a ray in one of the shark encounter tanks. It felt like a wet rubber brush with really short nubs. Could have petted a shark but I wasn't willing to stick my arm in the tank all the way to the elbow.
Back to the vendor hall, and spent the afternoon helping at the HGA booth. If you notice the sock rack, yours truly and another volunteer priced and hung (hanged?) all those socks!
Vendor Hall in Progress
While today was great, the real fun starts tomorrow!
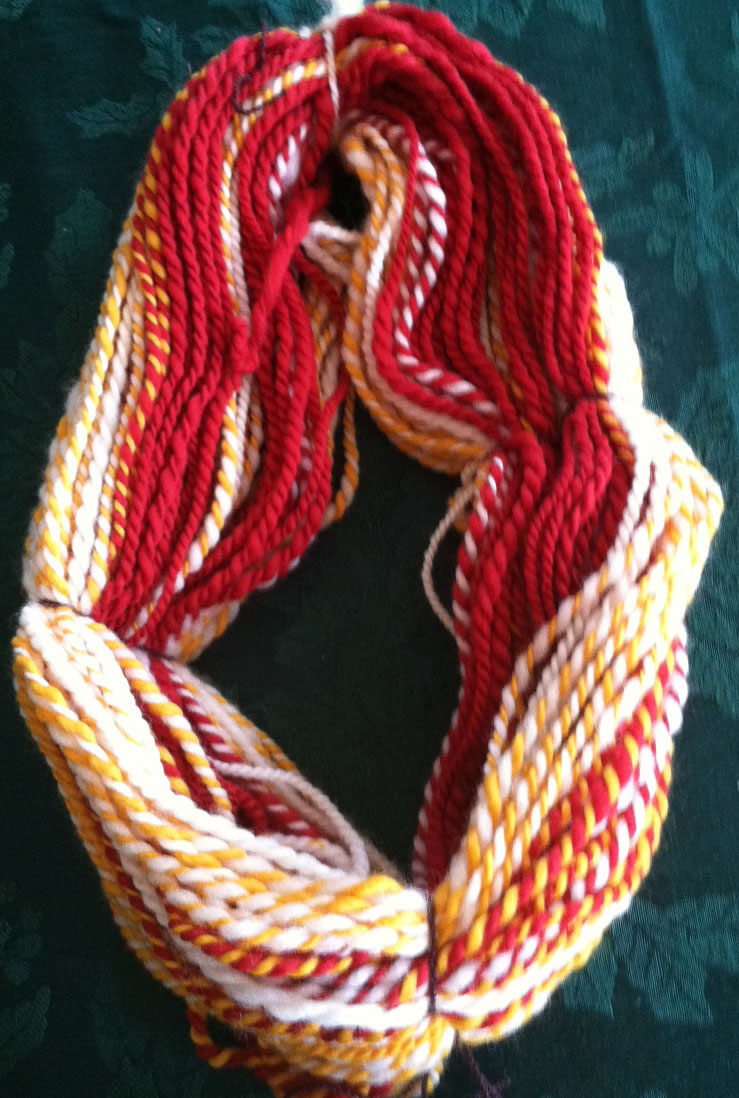
Finished my second project I call “Fractured Fractals.” I used
separate rovings in red, gold, and creamy white. Broke the red and gold
into two separate pieces each, the white into four. Alternated red,
white, gold, white. Divided each one in two lengthwise, so I had two
sets of eight pieces each. Spun one set “as is,” divided the other set
in two again, giving me sixteen pieces, and spun those in the same
R-W-G-W order.
The red and gold pieces were the hardest to draft that I’ve done, and
I really struggled to get a consistent thickness. When I got to the
white bits, drafting was so easy I got a little sloppy. Even so, I’m
pretty pleased with the result and after a break to spin somethings
non-fractal, I’m going to make another skein of this. Already have enough of all three colors and might as well get them out of my stash. Got 96 yards out
of this set.
I had quite a bit on my “short” singles bobbin from the tropical
fractals set -- so I use the Navajo ply technique on it. This is where you take a singles, attach it to the lead on your bobbin forming a loop, then chain by hand - similar to the way you would make a crochet chain stitch. The result is a three-ply yarn. If you watch your singles carefully, you can control your color changes so you don't get barber-poles (see the closeup above for an example) if you don't want them.
The first time I tried to Navajo ply, I failed miserably and thought I wouldn't ever try that again. But this time it was incredibly easy and I actually enjoyed using the technique. After finishing, I have 63 yards of this yarn. And I like the
result much better than the two-ply fractal skein I finished a couple of days ago. Plus I think this is my best spinning to date.
This whole thing has been a very good lesson for me in envisioning
how the spinning and plying methods used will create quite different
results.
The icing on the cake was being able to go to my guild meeting this afternoon. My friend Carol hosted it in her home and we worked on our projects while overlooking her reflecting pool and outdoor dining room. A few hours to relax with friends, and enjoy a beautiful day. It's the simple things like this that make life good.
Bunny Watson Enjoying the View
I started a new braid of fiber at Carol's - this is a merino called "Burning Bright" from Edgewood Garden Studios on etsy. You can see a little bit already spun on the photo above. Think I will Navajo ply this one too!
Sometimes I don't mind waking up before the alarm goes off.
Tuesday morning I did some fantasy treadmill walking -- in Holbrook, Arizona. Because it's very, very flat! And still had a couple of hours before I had to leave for work.
Finished my first skein of fractal spinning - 200 yards!
The two singles: Smaller bits on the left, larger ones on the right...
Plied...
Moving to Thor's reel...
It's all on the reel now...
Washed and all done!
Phew! On the one hand, I'm pretty proud of the result. Although it's still uneven, it's much better than my last yarn. On the other, I pretty much hate the result. It reminds me of the string they use in those cheap drawstring bags. Know the ones I mean?
I took it to class Wednesday night and got mixed reactions. Most of the people reacted like I did. A couple of them actually LIKED it. A lot. I guess there's no accounting for taste.
On to my next project. I'm calling this one "Fractured Fractals." Instead of using a space-dyed roving, I selected three solid colors of Merino - red, gold, and cream. Yes, I know I droned on in my last post about how much I hate predominantly yellow shades, but my school colors happen to be cardinal and gold. So loyalty won out over personal preference.
I decided to alternate the red and gold with the cream, so I broke the red and gold into two pieces each, and the cream into four. The repeat will be R-C-G-C.. Split each of those pieces in half lengthwise, and set half of those aside. The other half I split into four pieces, so there will be two repeats on the first set and eight repeats on the second one.
Pre-drafted the first big red piece. Not good. Maybe it's felted a little, or maybe I was just having a bad day, but it felt like the fibers just didn't want to separate. Finally got it loosened up enough to spin, I thought. But spinning was just as difficult. I kept having to stop to draft and also had lots of breaks. Decided to give myself the rest of the day off -- it was Independence Day, after all.
I may go back and unspin what I did, and try carding it to see if I can loosen up the fibers. Or shove the whole thing back in the roving bin and work on something else!
 Soon as I got home I had to check out the case. Everything fits just right and the foam in the case even keeps all the small stuff from moving around. Now I need to figure out how to embellish it so it's clear that it does
not contain firearms. As much as I'm in favor of keeping my
constitutional rights, I don't need anybody thinking I'm carrying.
Soon as I got home I had to check out the case. Everything fits just right and the foam in the case even keeps all the small stuff from moving around. Now I need to figure out how to embellish it so it's clear that it does
not contain firearms. As much as I'm in favor of keeping my
constitutional rights, I don't need anybody thinking I'm carrying.


 Mid-Gauge Basics + Much More.


 Hand Manipulated Stitches for Machine Knitters.


 In addition to bow loom weaving, it includes quite a few other folk arts that can be enjoyed by children and adults alike. I've been using Marilyn's book as a guide to teaching the bow loom as an introduction to basic weaving concepts and it works! Other crafts include aboriginal dot painting, Viking knitting (aka wire weaving), Huichol beading, natural dyes, weaving on a simple home-made loom, baumschmuck, paper stars, block printing, Pysanky, dreamcatchers, wet felting, twining, Maasai beading, and dragon boats. I bought this book for my own enjoyment, but encourage anyone who wants to introduce crafts to their children (or grandchildren) to start here.